Keeping your CPU cool starts with the right contact between chip and heatsink. Heat transfer compounds fill tiny gaps so a processor can shed heat. Skipping that layer or reassembling without it risks overheating and lasting damage.
Before you add new compound, clean both surfaces thoroughly. Old residue must come off the chip and the cooler so the new layer works as intended. Different application methods exist, but some can trap air and reduce performance.
After reassembly, check idle and load temperatures. Modern chips often have a TJ Max near 100°C and may begin throttling around 80°C. If temps stay high or you see throttling, re-seat the cooler or reapply the compound.
Key Takeaways
- This guide shows when to refresh compound on a CPU and how to avoid mistakes.
- Proper cleaning of both surfaces is essential before applying new material.
- Use modest amounts; too much can harm cooling instead of helping it.
- Verify results by monitoring idle and load temperatures after reassembly.
- Know typical chip limits: expect throttling signs near ~80°C and TJ Max close to 100°C.
Why thermal paste matters for modern CPUs and laptops
Even small gaps under the heat spreader can turn a fast cpu into a throttled one. Modern chips push power and heat into a tiny silicon die, then rely on the integrated heat spreader to move that energy to the cooler.
Heat transfer, IHS, and why air gaps ruin cooling
The IHS (usually nickel-plated copper) spreads heat from the die to the cooler. Polished surfaces still have microscopic pits. Without proper contact, air fills those gaps and blocks heat flow.
Air is a very poor conductor — thousands of times worse than copper — so even tiny pockets create hotspots at the center of the spreader.
Thermal throttling thresholds and performance loss
When contact is bad, cpus climb toward firmware thresholds. Many processors begin throttling near 80°C and reach critical TJ Max values around 100°C.
- Good paste ensures steady heat transfer from the cpu die through the heat spreader to the cooler.
- On laptops, tight cooling makes correct application even more important for comfort and battery life.
- Proper coverage reduces fan ramping and prevents sudden performance drops under sustained load.
When it’s time to replace thermal paste
Watch for steady temperature rises and louder fans; they often signal a heat-transfer issue.
It’s time to refresh when idle and load temps climb compared with past behavior, fans run loudly more often, or the cpu begins to throttle under tasks that used to run smoothly.
Over years, common compounds can dry out or pump out from between the IHS and cooler. That raises thermal resistance and lets more heat build up. Some makers rate certain products for multi-year life, but those claims assume correct mounting and normal cycles.
Always reapply after you remove a heatsink for service or to upgrade a cooler. Clean both contact faces first, then put on fresh paste before you reassemble. Long gaming sessions, heavy rendering, or frequent multitasking shorten effective service time.
- Symptoms: higher idle/load temps, louder fans, intermittent throttling on the cpu.
- Timing: check after a couple of years or after heavy use or transport.
- Laptop note: if cleaning dust doesn’t fix warmer, noisier operation, new paste often helps.
Use this guide to assess the signs and pick the right time to refresh. Small checks now can avoid bigger problems later.
Safety first: power, ESD, and heat precautions
Start by shutting down the operating system, unplugging all power, and waiting at least five minutes before you touch any cooler or fan. This lets residual heat in fins and heatpipes drop and reduces the risk of burns or accidental slips that can damage components.
Shut down, unplug, and wait to cool
Confirm the device shows no power: LEDs off and chargers disconnected. For a laptop, extra minutes help because thin fin stacks hold heat longer.
ESD protection and safe work surfaces
- Ground yourself with an ESD strap and work on a clean, non-conductive surface free of liquids and clutter.
- Use hand tools, not powered drivers, to avoid stripped screws or cracked plastic.
- Keep screws and brackets organized, handle cables by connectors, and never touch the CPU contact areas or cooler base with bare fingers.
Keep drinks and pets away, move slowly, and double-check each step. Patient, careful work protects the system and helps your results last.
Tools and materials you’ll need
Gathering the right tools first saves time and keeps your work clean and safe.
You’ll want items that protect surfaces and avoid damage to the cpu or cooler during service. For laptops, note captive screws and fragile cables so you handle modules gently.
- Quality thermal paste and thermal compound options: non-conductive compounds (e.g., Noctua NT-H1/NT-H2), higher-performance conductive types, or liquid metal for advanced users.
- Cleaning supplies: isopropyl alcohol (90%+), a lint-free cloth or coffee filter, and optional ArctiClean for stubborn residue.
- Tools and small gear: a plastic spudger, powder-free nitrile gloves, correct screwdriver bit sets (many laptops use Torx T5), and a magnetic tray for screws.
- Use the flat end of the spudger to lift solid residue; avoid metal tools that can scratch the IHS or heatsink.
- ESD wipes or cleanroom cloths keep oils off contact surfaces; paper towels work for the bench.
- A soft work mat prevents slips, and avoid powered drivers to stop stripped screws or damaged threads.
Accessing the CPU cooler on desktops and laptops
Begin on a flat surface with good light so you can see screws, cables, and mounts clearly. Power down, unplug everything, and wait until all status LEDs go dark before you start.
Desktop cases: remove the left side panel and lay the case on its side on a sturdy workbench. This gives stable access to the cooler and motherboard area. Keep cables gently out of the way and photograph routing so you can return each connector to its original place.
Laptop considerations: follow the maker’s screw order and never yank ribbon cables. For Framework-style models, place the laptop upside down on a soft surface, remove the five captive T5 screws, and open the lid to about 120°.
- Use a proper T5 bit or the correct Phillips bit to avoid stripped screws.
- Remove fan screws first, then loosen heatsink screws in the printed 3‑2‑1 order to release pressure evenly.
- Break the paste bond by twisting the heatsink slightly; then unplug the fan cable by sliding it straight out—do not rock or pull at an angle.
Take your time. Avoid powered drivers, track screw lengths, and keep parts organized. A careful disassembly makes reassembly easy and keeps the cooler working at peak performance.
Cleaning the old paste from the heat spreader and heatsink
Use the flat end of a plastic spudger to lift hardened residue from the CPU surface. Work slowly and keep debris away from nearby SMDs. Do not use metal tools; scratches raise thermal resistance and can leave conductive shards near circuitry.
Dampen a lint-free cloth or a coffee filter with isopropyl alcohol and wipe both the IHS and heatsink until no discoloration remains. Rotate to clean patches often so you don’t smear old material back across the surface.
- Start by nudging old paste with the plastic spudger; avoid metal contact.
- Wipe with a fresh cloth or coffee filter; avoid tissues that shed fibers.
- Keep fingers off cleaned areas—skin oils reduce contact quality.
- Let both faces air-dry completely; allow extra time if you used lower‑purity solvent.
Inspect the mating surface under good light. If you see streaks or haze, repeat cleaning until the surface looks crisp. Pick up any residual material near the socket using the spudger tip wrapped in a clean wipe.
Once pristine and fully dry, you’re ready to apply thermal paste. Keep the work area calm and dust-free; even a tiny mote can change the amount of compound needed for optimal contact.
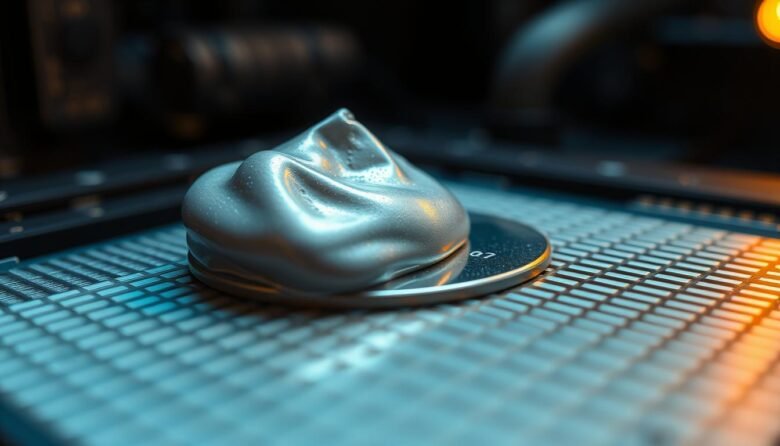
Choosing and applying thermal paste: methods that work
Choosing the right spread pattern makes the difference between even cooling and localized hotspots.
Dot and short line methods minimize trapped air and usually spread evenly under pressure. A center dot or a short vertical/horizontal line works well for many desktop cpus and most retail cpu cooler mounts.
Surface spread gives visible coverage but risks small air pockets if you drag or overwork the compound. Use it only if you are confident and aim for thin, even layers.
CPU differences and coverage
For center-focused dies, a pea-sized dot in the middle typically hits the die once the cooler seats.
Large IHS or multi-chiplet layouts need broader patterns—crosses, small dots near corners, or a longer line help reach the edges.
Conductive vs non-conductive and liquid metal
Non-conductive compounds are safer for first-time users. Electrically conductive options and liquid metal improve thermal conductivity but raise shorting and corrosion risks.
- Only use liquid metal on nickel-plated copper blocks and compatible IHS surfaces.
- Test the spread: mount, remove, inspect, and adjust the amount if you see overflow near sockets or caps.
Mounting the heatsink and fan correctly
Align the cooler so it sits centered on the IHS, then drop it vertically to prevent uneven spread. Lowering straight down keeps the new layer even and avoids smears that cause hotspots.
If removing an old mount, gently twist the cooler to break the bond before lifting. Twisting reduces the chance the processor lifts from the socket or that the surface peels unevenly.
Start screws by hand to catch threads. Then tighten in a crisscross pattern to apply uniform pressure from the center outward.
- Hand-start each screw so threads align cleanly.
- Tighten in sequence (crisscross/1-2-3) to avoid warping the cooler base.
- Do not overtighten — excess torque can warp the surface and cause hotspots.
For laptops, follow the maker’s printed order and check that all thermal pads sit where they belong. On designs like Framework, remove fan screws first, unplug the fan straight out, and confirm the plug orientation before final tightening.
- Keep cables away from fan blades and do a light spin test.
- Inspect standoffs and posts in the case so the assembly sits flat on both sides.
- After mounting, verify pads, screws, and cables are snug and nothing blocks airflow.
Thermal paste replacement guide: validate temps and fix issues
Start by measuring idle temps to make sure the cooler and compound are doing their jobs. Boot the system and run HWiNFO to record idle values; as a rule of thumb, idle should sit roughly 20°C above room temperature.
Idle and load checks with monitoring tools
After baseline readings, run a controlled load like Cinebench or a long game session to see peak behavior. Watch for thermal throttling flags, sudden clock drops, or power-limit events.
- Boot and note idle temps with HWiNFO; compare to ambient.
- Run Cinebench or a heavy game to observe peak temperatures and throttling.
- Check fan curves and confirm the cpu cooler spins and responds correctly (PWM/DC).
When to re-seat, reapply, or reconsider cooler capacity
If temps spike quickly or throttling appears, shut down, clean contact faces, and re-seat the cooler using a crisscross tightening pattern. Use less compound on the next attempt if you saw squeeze-out near the socket.
- Re-seat and tighten in a crisscross pattern to fix uneven mounts.
- Reapply thermal paste if cleaning and re-mounting show no improvement.
- Consider a higher‑capacity cooler when temps remain high after correct mounting.
Track results over time and keep a simple image log of pad placement and cable routing. A stable system that holds expected clocks and temps means the job succeeded and you picked the right time to service the cpu.
Your next cool, quiet steps
With the cooler reinstalled, confirm fasteners are snug but not overtight and that magnetic covers align without force.
Check the touchpad cable seating on a laptop and use the correct bit for bottom cover screws. If your new heatsink/fan arrived with pre-applied paste, do not add more.
Keep a short maintenance log with dates, brand, and observed temps. Optimize case airflow and tidy vents where you place the system to reduce ambient heat and fan ramping.
Keep quality tools handy—proper bits, a plastic spudger, wipes, and IPA—so future service stays quick and clean.
Follow this guide when you upgrade or service components, and share results to help others choose reliable products and methods.