Tuning your CPU or GPU to run faster than factory speeds can lift frame rates and responsiveness in games. This guide explains the process in clear steps so beginners can improve performance without guessing.
Start by learning how clock speeds, voltage, power draw, and cooling affect your system. Use tools like MSI Afterburner, Intel XTU, or AMD Ryzen Master to make small changes and monitor results.
Take gradual steps and stress test with Prime95, 3DMark, or FurMark to confirm stability and acceptable temperatures. Tracking clocks and voltages with HWMonitor or HWiNFO helps you avoid problems.
Key Takeaways
- Raise clock speeds in small increments to balance gains and reliability.
- Monitor voltages, temps, and power to keep components within design limits.
- Use BIOS/UEFI or trusted software and verify stability with stress tests.
- A proper cooling plan and measured adjustments reduce the risk of damage.
- Follow a repeatable process to tune performance over time and validate improvements.
Why this guide matters right now for safer FPS gains
Smart, measured tuning of core and memory clocks can raise frame rates by five to fifteen percent on many builds. This guide shows how to get that extra performance without guessing or wasting time.
Why act now: game engines and drivers improve often, so small tweaks can extend the life of your system. Update GPU drivers, remove dust, and confirm your power supply can handle added limits before you begin.
- Modern tools and stress testing reveal safe headroom so you keep stability while limiting heat and power spikes.
- Treat the system holistically: airflow, PSU capacity, and temperature tracking prevent instability and wasted effort.
- Follow a stepwise process: small clock bumps, short stress runs, and real-game testing to judge meaningful gains versus extra power draw.
Overclock safety basics
Balancing clocks, voltage, and cooling is the core of getting reliable FPS gains. Think of these three as a triangle: push one corner and the others must follow. Small changes give measurable performance without risking long-term damage.
Clock speeds, voltage, and heat: the stability triangle
Raise core or memory clock too far and the system can show artifacts or crashes. Increasing voltage can hold higher speeds, but it also raises heat and power draw.
Good hardware and airflow keep temperatures in check. That lets you test longer and detect instability before it becomes a problem.
Core vs. memory clocks and how they impact frame rates
GPU core clock boosts shader throughput; memory clock raises VRAM bandwidth. Different games favor one over the other, so test both.
CPU frequency comes from base clock times a multiplier, so small multiplier changes change overall speed a lot. Use monitoring software to watch temps and voltages while you tune.
- Stability first: test after each small change.
- Watch temps: cooling limits your next step.
- Measure gains: validate real gaming performance, not just synthetic numbers.
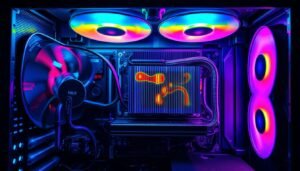
Prep for safety first: cooling, power supply, and clean airflow
A cool, well-fed system lets you test higher speeds with less risk of instability. Start by assessing case airflow and overall cooling so the chassis can shed heat during gaming and sustained tuning runs.
Air versus liquid options and when to upgrade
High‑end air towers handle many everyday speed targets quietly. Liquid cooling can help when thermal density climbs or when quieter operation under load is a priority.
Power delivery and choosing a capable PSU
Pick a power supply with wattage headroom and good efficiency to prevent voltage droop when you raise GPU limits or CPU Vcore. Stable power delivery keeps the system responsive under peaks.
Dust, fans, and fan curves to keep temperatures in check
Clean filters and heatsinks, free obstructing cables, and add front‑to‑back case fans for steady airflow. Use motherboard utilities or MSI Afterburner to tune fan curves so temperatures stay consistent across components.
- Plan headroom: ensure cooling and supply can handle extra thermal load before overclocking.
- Check fans: verify fans spin freely and aren’t noisy or vibrating.
- Upgrade if needed: step up cooling or PSU rather than pushing beyond thermal limits.
Tools like BIOS/UEFI and software made for designed overclocking
Choosing the correct utilities matters: they put precise controls for core and memory clocks, power limits, and fan curves at your fingertips.
GPU tuning apps
MSI Afterburner and EVGA Precision X1 give sliders for core/memory clock, power/temperature limits, voltage, and custom fan curves. These apps make small changes easy and reversible.
CPU tuning software
Intel XTU and AMD Ryzen Master expose multiplier, Vcore, and memory settings from Windows. They speed up the process of testing and saving profiles for your system.
Monitoring essentials
Pair tuning utilities with HWMonitor, HWiNFO, CPU‑Z, and GPU‑Z to validate frequency, voltage, temperature, and power in real time.
- Select software that supports your hardware so settings are accurate.
- Favor tools that enable small, reversible changes and profile saving.
- Use overlays to watch temp, clock, and power while gaming and during testing.
Tip: Keep firmware and drivers updated so the software recognizes your hardware and prevents unexpected damage or misreadings.
Establish a baseline before you touch a single setting
Before you change a single setting, capture how your rig performs at stock so every gain is measurable.
Update GPU and chipset drivers, then run 3DMark or Unigine Heaven and a couple of demanding games. Log average FPS and 1% lows to see real-world performance, not just peaks.
Record clocks, temps, and voltages
Use HWMonitor or HWiNFO to capture idle and load temperatures, GPU core/memory clocks, and CPU voltage. Note CPU frequency math (base 100 MHz x multiplier) so you can compare stock against later changes.
Make tests repeatable
Run the same scenes multiple times. Record ambient room temperature and power draw during stress runs so you understand your cooling cushion and PSU headroom.
- Document everything in a simple spreadsheet.
- Track which test, the exact scene, and timestamps for each run.
- Keep hardware and drivers current for consistent comparisons.
This step saves time and makes increasing clock speeds or other adjustments measurable in this guide to better, stable performance.
Step‑by‑step GPU overclock: small increments that prevent damage
Begin with clear limits so each change shows measurable impact on game smoothness.
Increase power and temperature limits
Lift the GPU power slider slightly and nudge the temperature limit up a bit so the card can sustain higher clocks without throttling. Avoid pushing the cap above about 90 °C.
Raise core clock in tiny steps
Increase the core by 10–20 MHz at a time. Run a quick 3DMark, Unigine Heaven, or a short FurMark loop after each change to catch artifacts or crashes early.
Boost memory in larger steps
Move memory by 50–100 MHz increments. Memory often holds more headroom, and bandwidth gains can improve minimum frame times.
Optional voltage and fan tuning
Only add small voltage if cooling and PSU allow it. Then set a firmer fan curve in MSI Afterburner or vendor software to offset added heat.
- When instability or crashes appear, roll back one step.
- Validate gains in real games, not just benchmarks.
- Save profiles so you can switch settings quickly.
Step‑by‑step CPU overclock: multipliers, 100 MHz base clock, and Vcore
Use a steady plan when raising CPU frequency. Change one multiplier notch at a time, remember the base 100 MHz multiplies directly into core speed, and run a short test after each step.
Adjust multiplier gradually; understand the 100 MHz base clock
Each multiplier increment equals 100 MHz of frequency. That makes increases predictable and easy to track.
Move the multiplier in small increments, then run a quick stress or gaming test to confirm stability and real performance gains.
Small voltage bumps only if needed; manage heat proactively
If the system errors or crashes, add the tiniest possible Vcore step (around +0.01V). Watch temperature closely and keep load temps near or below 85 °C.
Cooling matters: modest voltage rises can raise heat fast, so monitor fans and case airflow while testing.
When to use BIOS/UEFI vs. software like XTU or Ryzen Master
Use XTU or Ryzen Master to explore limits and make quick changes inside the OS. For final, consistent settings, commit to BIOS/UEFI where profiles and voltages are stable across boots.
- Understand the math: 100 MHz x multiplier = CPU frequency.
- Test between steps: validate stability before increasing voltage.
- Save a profile: keep a stable configuration and be ready to revert if ambient temperature rises.
Stress test and benchmark the right way to ensure stability
Run focused stress loops and benchmarks to confirm your tweaks hold under sustained load.
Start synthetic testing with GPU loops like 3DMark and Unigine Heaven. Use short FurMark runs only to expose weak points because it pushes temperatures fast.
GPU checks: loop synthetic benches and watch temps
Loop 3DMark or Heaven for 15–30 minutes to verify clock consistency and frame pacing. Track temperatures and power consumption with HWiNFO or HWMonitor while you run the loop.
CPU checks: long runs under Prime95 and AIDA64
Run Prime95 (blend or small FFTs) and AIDA64 for at least an hour. Monitor temperature and voltage to make sure the CPU holds the target clock without throttling or instability.
Validate with real games
After synthetic passes, play the demanding titles you actually use. Look for artifacts, stutter, or system crashes. Any failure is a signal to step down clocks or adjust voltages.
- Pair loops with monitoring: synthetic stress plus temps confirm sustained behavior.
- Watch clocks: ensure hardware stays at target speeds and does not throttle.
- Record outcomes: log pass/fail, temps, and power to reproduce a stable profile quickly.
Temperature and voltage guardrails to prevent damage
Healthy temperature and voltage guardrails keep daily performance stable without surprise failures. Set clear ceilings so you know when to stop and protect parts from long‑term damage.
Safe operating targets and when to dial back
Aim to keep GPUs under roughly 85 °C during regular gaming and CPUs near 85 °C in extended runs. Use the lowest voltage that stabilizes your target clock and avoid extra volts once stability is reached.
- Set explicit temperature and voltage limits to prevent damage and preserve components.
- If temps or voltage spike, reduce clocks or Vcore immediately and improve cooling or power delivery.
- Watch for subtle instability—minor stutter or rare errors can precede bigger failures.
- Recheck guardrails when ambient heat rises; seasonal room temps reduce headroom.
- Favor long‑term stability and quiet operation over tiny performance gains; document thresholds and stick to them.
Troubleshooting: when your system becomes unstable or crashes
Spotting the first signs of instability helps you fix issues before they cause data loss. Start by noting visual glitches, driver resets, or sudden system crashes. These signs usually show up before permanent damage.
Signs of instability: artifacts, driver resets, blue screens
Look for visual artifacts, screen flicker, and driver timeout messages. Blue screens or hard freezes are clear signals the rig needs attention.
Keep a log of when a problem happens, what software ran, and any recent changes to settings or hardware. That record helps you separate a bad tweak from an environmental issue.
Rolling back: clear CMOS, lower clocks, adjust power and cooling
If the PC won’t POST, clear CMOS and boot stock. Then re-enter only proven changes, not everything at once.
- Reduce multipliers or GPU clocks in small steps and re-test with Prime95, AIDA64, or 3DMark/Heaven.
- Verify PSU capacity and case airflow; marginal power delivery or blocked cooling often looks like frequency limits.
- Reseat hardware and check thermal paste if temps spike; loose contact can trigger sudden instability.
- Use the same tools and software you used earlier to confirm stability after each rollback.
Tip: Some motherboards are designed overclocking platforms and include recovery features. Use those to avoid repeated manual resets and speed troubleshooting.
The small increments mindset: how “time under test” builds stability
Treat each tuning step like an experiment: change one variable and let the system prove the result. Use short, repeatable trials so you learn real effects instead of chasing random spikes.
Run 20–30 minute stress loops after each change and watch clocks, temperature, and voltage with HWiNFO or HWMonitor. These small increments help you spot intermittent failures that quick checks miss.
Let the rig settle for several minutes before judging results. Temperatures and voltage often stabilize after a warm-up period, and that calm period tells you if the tweak holds under repeated testing.
Extend final runs to multiple hours for daily‑use profiles. Use the same scene and test method so comparisons are fair. Track ambient room temp and fan behavior to spot cooling drift over time.
- Make one change at a time and give it time under stress.
- Prefer a slightly lower clock that proves stable over a fragile peak.
- Re-test after driver or BIOS updates; margins can shift.
Result: a repeatable process that builds durable performance and true stability for your system.
Your safe path to better performance and higher frame rates
Your safe path to better performance and higher frame rates
Wrap up tuning with measured checks so the system delivers steady performance every day. Treat each final step as verification: short stress loops, a play session, and saved profiles make gains repeatable.
Balance better performance against power consumption and noise. Confirm your cooling (air or liquid cooling) and a strong power supply can handle extra load so hardware and components stay healthy.
Use software like MSI Afterburner, Intel XTU or Ryzen Master and tools like HWiNFO and GPU‑Z to watch temps, clocks, and voltages. Keep changes modest, reversible, and documented to prevent damage.
Follow this guide, prioritize stability over peak speeds, and you’ll get a lasting uplift that fits your goals.